How to make paneer at home | Homemade paneer recipe
By Swasthi on August 27, 2022, Comments, Jump to Recipe
How to make paneer at home – an easy step by step recipe to make paneer at home. Making paneer at home is very easy and there is no rocket science involved to get perfect soft paneer each time you make. Most store bought Indian cottage cheese or paneer contains additives so I make my own paneer at home.

Homemade paneer is much superior in taste, freshness and flavor than the store bought ones. You also have the chance to choose the milk you desire. If you are new to Indian Cuisine, then these FAQ may help you.
What is paneer?
Paneer is a kind of fresh cheese made by curdling milk using an acidic food ingredient like lemon juice, vinegar, buttermilk, yogurt (curd) or citric acid.
Paneer is a soft yet firm, non melting cheese that is made without using any kind of rennet. It is also not fermented or aged like other kinds of cheese.
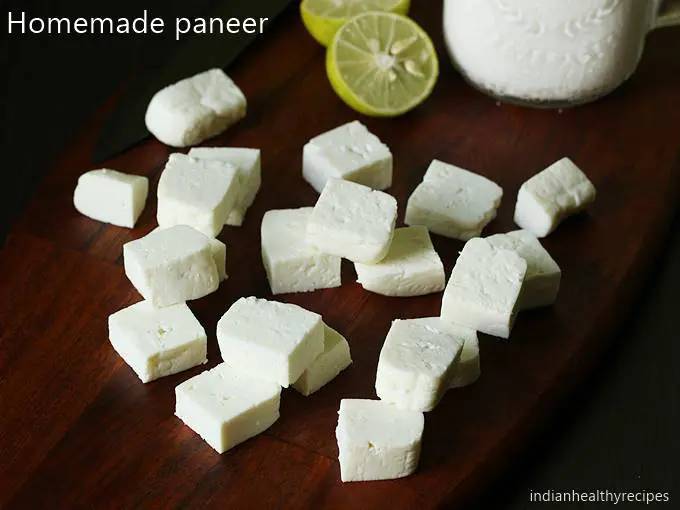
To make paneer or chenna, milk is boiled and then curdled with a acidic ingredient. The curdled milk solids are then drained to a muslin or cheese cloth. Later it is pressed with a heavy object to set and then it is cubed to pieces.
These cubes are used to make various Paneer recipes like
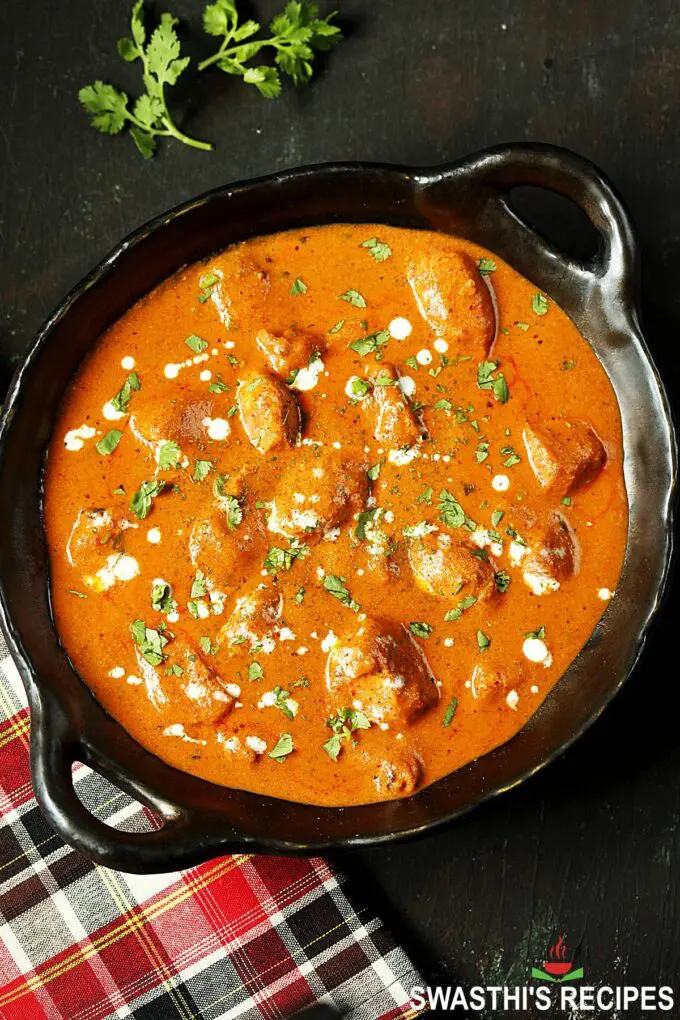
Paneer butter masala
Matar paneer
Paneer tikka masala
You can also use paneer without setting in recipes like
Malai kofta
Paneer bhurji
Paneer sandwich
Acids used to make paneer
Commercially sold paneer is made using citric acid. For homemade paneer – yogurt, lemon juice, or vinegar are the choices to curdle the milk. The taste, flavor & texture of the Indian cottage cheese depends on the kind of acidic ingredient used.
1. Yogurt yields very soft yet firm paneer. You can skip rinsing the chenna but it has to be very well drained by squeezing the excess whey. Then it has to set. Using too much curd to curdle will impart a mild yogurt flavor to the cheese.
2. Lemon juice imparts a lemony flavor to the curdled solids (chenna) so it has to rinsed well. Too much lemon juice will make the cheese grainy.
3. Vinegar is the most preferred acid by home cooks as it curdles the milk faster then yogurt or lemon juice. Too much vinegar alters the flavor of paneer.
Using yogurt for curdling milk yields the best soft paneer. But lemon juice or vinegar can also be used.
How much lemon juice to use?
Many readers write to me asking if there is any standard amount of lemon juice or vinegar to use per liter of milk to make paneer.
No! there is no standard amount of acidic ingredient to add per liter of milk as it entirely depends on the kind of milk. Commercial milks are much processed to increase the shelf life. So no 2 packs of milk may be the same even if they are from the same brand.
In my many years of experience I have seen farm fresh raw unpasteurized milk curdles just with few drops of lemon juice. While the commercial milk needs different amounts of vinegar or lemon juice each time.
So how much acidic ingredient to use is purely judgmental and just go ahead adding the minimum. The measures given below in the recipe card are approximations of what works well for me.
How to make paneer at home
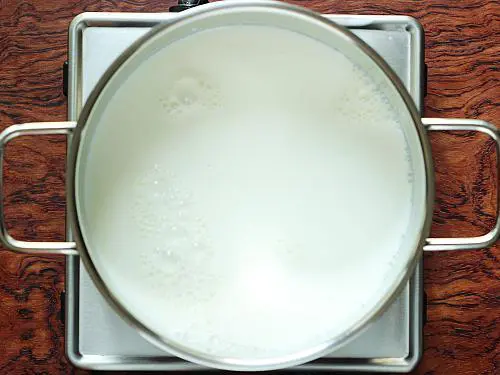
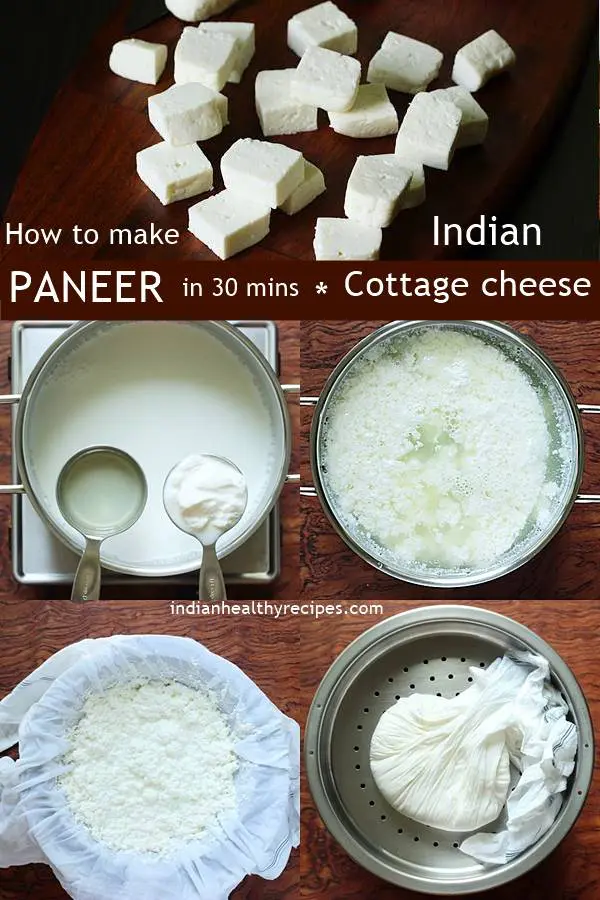
1. Pour 6 cups milk to a heavy bottom pot and bring it to a gentle boil on a medium flame.
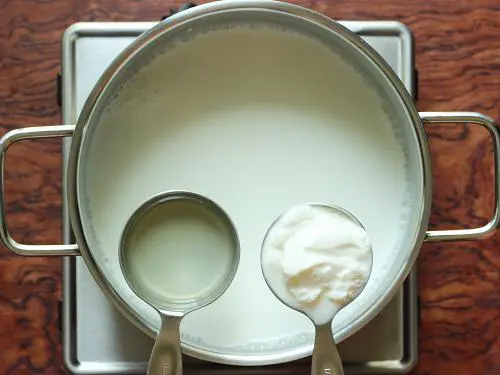
2. Keep your acidic ingredient ready such as – yogurt, lemon juice or vinegar. Please use only one. When the milk comes to a boil, turn off the stove. Add 2 tablespoons of vinegar or ¼ cup of yogurt. Give a good stir for 1 minute.
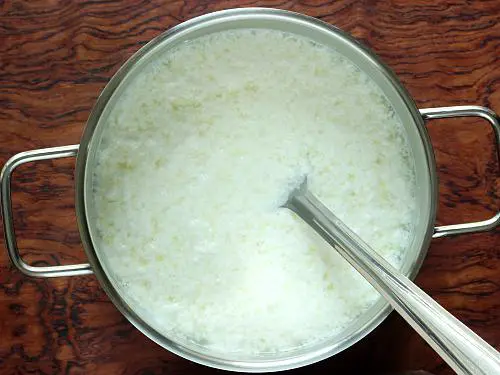
3. Milk begins to curdle immediately and solids separate from the whey. If it doesn’t, then turn ON the stove and continue to boil till you see the solids separate completely. If needed you may add another teaspoon of vinegar.
Note that non-homogenized milk curdles faster. Homogenized milk takes longer to curdle as it is processed for a good shelf life.
4. Turn off the stove as soon as you see the milk has curdled completely. When the paneer is done correctly you will see the whey being clear and not milky. The color of the whey will be yellowish or green but not milky white.(check video). It is important you turn off when it is done. If you continue to cook longer, it becomes hard and grainy.
Draining
5. Place a colander over a large bowl (to collect the strained whey). Layer it with a clean cheese cloth (or muslin cloth). A thin new handkerchief works well too. Transfer all of the curdled milk to the colander.
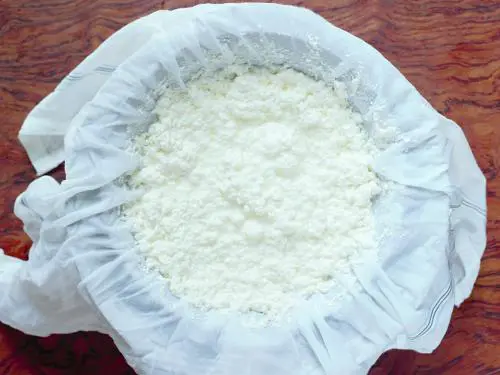
6. Immediately pour cold water to get rid of the vinegar smell. Later rinse the paneer well a few times under running water until it is clear of the vinegar.
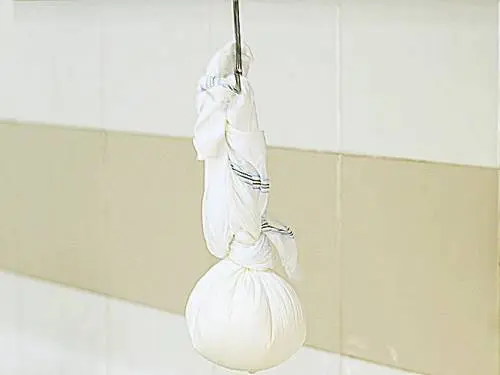
7. Squeeze off the excess water. Make a knot and hang this for 30 mins. This helps to drain the excess whey. Paneer should still be moist after draining.
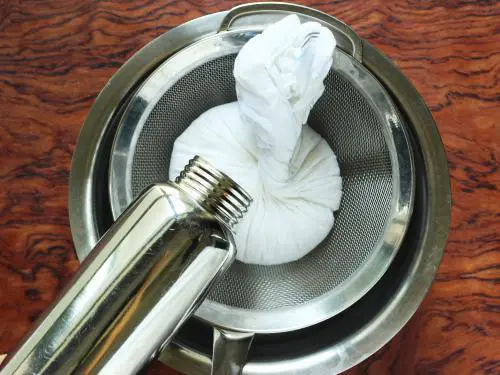
8. Keep the entire pack on a flat colander or a plate or wooden board. Form a nice round shape by wringing the cloth. (check video)
9. Place a heavy object weighing at least 2.5 to 3 kgs. I fill my pot with uncooked rice and place over it. Any heavy object will just work well to set paneer. Allow it to set for about 3 to 4 hours.
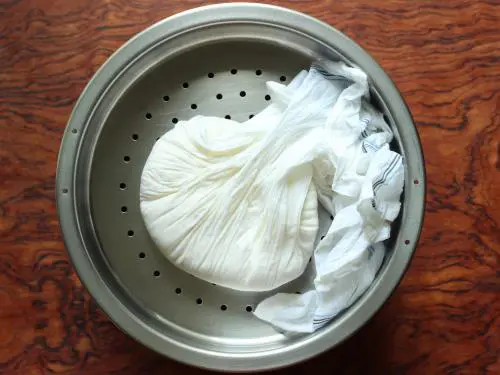
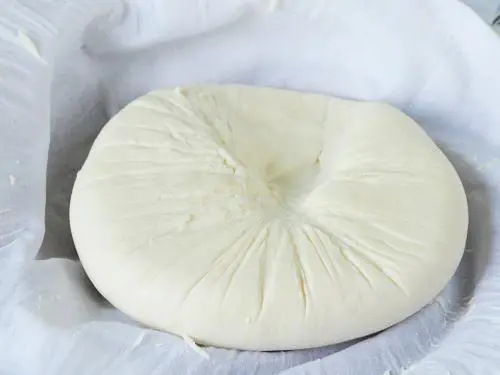
10. Remove the cloth and you will find a round block of paneer. You will also notice a dent on the block. It is just normal.
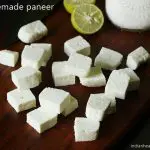
11. Slice the paneer. Use or Refrigerate for further use. I usually put the entire block in a steel box and refrigerate. I cut only when needed. You can also cut them and freeze.

How to choose milk for paneer
- Use full fat fresh milk. Do not use stale or milk that has gone beyond the expiry date as it is unhealthy & does not yield good results.
- Cow’s milk, buffalo milk or goat milk can be used to make paneer. The key to make good paneer is the amount of fats. If using buffalo milk then keep stirring to prevent the milk getting scorched at the bottom. The fats in the buffalo milk get stuck to the bottom quickly.
- Best homemade paneer can be made from non-homogenized & raw milk. However if non homogenized milk or raw milk is not available you can also make homogenized & pasteurized milk just like the way I did.
- Avoid using skimmed milk as it yields lesser paneer. Also avoid using low fat milk to make paneer as it may not set well.
Tips to make soft paneer
The following tips will help you to make soft and well set paneer.
- Always add the acidic ingredient like lemon juice, vinegar or curd only after the milk comes to a boil.
- Once the acid ingredient is added to the milk, stir and check if the milk has curdled completely. If not add as much needed and turn off the stove in time.
- Do not continue to boil after the milk has curdled completely. This makes the paneer very hard & grainy.
- Use just the right amount of acids to curdle the milk. Using too much of acidic ingredient makes the chenna or paneer grainy and rubbery. So add the lemon juice in batches only as needed.
- I always prefer to pour some cold water or ice cubes immediately to the pot to stop it from cooking further. You can also skip this step and transfer the paneer quickly to a colander that is lined with muslin cloth. Immediately rinse it under running water.
- Always drain and squeeze the chenna or milk solids well.
- Ensure there is no excess whey in the milk solids before you keep it for setting. To ensure this I always hang the paneer for 30 min to drain it completely otherwise the paneer will not set well.
Why do paneer cubes break in the gravy
Low amount of fats or excess whey in the chenna won’t set the paneer well. The cubes may break as soon as it is added to the gravy. So I always ensure to squeeze off the excess whey before keeping the chenna for setting.
Add the cubes to the gravy only after it has thickened. Cover the pan after adding the cubes. Turn off the stove. The heat in the pan is enough to cook it.
Related Recipes


How to make paneer
For best results follow the step-by-step photos above the recipe card
Ingredients (US cup = 240ml )
- 1 ½ liters full fat milk (6 cups)
- 2 to 3 tablespoons vinegar (substitute with lemon juice or ¼ cup yogurt)
Equpiment needed
- 1 colander (strainer)
- 1 cheese cloth (muslin cloth or fresh handkerchief)
- 1 large bowl (to collect whey)
- 1 to 2 heavy objects
Instructions
Preparation
- Pour milk to a heavy bottom pot & bring it to a gentle boil on a medium heat. Keep stirring occasionally to ensure the milk doesn't get scorched at the bottom.
- Meanwhile place a colander over a large bowl to collect the whey. Spread a cheese cloth over the colander.
How to make paneer
- When the milk comes to a boil, turn off the stove and pour 2 tablespoons of vinegar.
- Stir it well for 1 to 2 mins until the entire milk curdles completely. (milk solids begin to separate from the whey). When done correctly whey will be not be milky any more but will be clear.
- Troubleshooting: If you see the milk doesn't curdle fully, then add 1 tbsp vinegar and turn ON the stove. Boil the milk on a medium heat until the whole pot of milk curdles. Turn off as soon as you see it curdles. If you continue to cook at this stage, paneer can become hard.
- Gently pour the entire paneer along with whey to the colander. Pour some cold water to stop the paneer from cooking further.
- Rinse it under running water to remove the smell & taste of the vinegar.
How to set paneer
- Wring the cheese cloth making a round shape of the paneer. Squeeze any excess whey or water. Make a knot and hang the paneer for 30 mins so the excess whey drains.
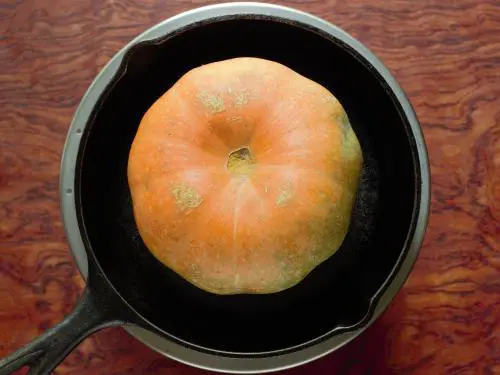
- Remove the knot and twist the edges of the cloth. Place the cheese cloth along with the paneer on a flat colander or a wooden board. Press down the cloth & place a heavy object on it for the paneer to set. (check the video below)
- I usually put a pot or cast iron pan over the paneer and then place a 2 to 3 kg rice pack.
- After 3 to 4 hours, remove the cloth and cut the paneer to cubes.
- Refrigerate the homemade paneer and use up with 2 to 3 weeks. Or freeze up to 3 months.
- Avoid overcooking the paneer after adding it to the curry. It does not need much cooking. I generally add it to the gravy and turn off the stove. Keep the pan covered so the paneer absorbs the flavors.
Notes
- Please use only full fat fresh milk or whole milk as high fats in the milk will yield more paneer & will set well.
- Non-homogenized milk curdles faster while homogenized milk takes longer to curdle. So you will need to boil a little longer until it curdles fully.
- Do not use milk that has gone beyond the expiry date. This may affect the flavor.
- Adding sufficient amount of acidic ingredient like lemon juice, vinegar or curd (yogurt) is very essential otherwise the milk will not curdle. So you may need to add more than what is mentioned in the recipe card.
- Similarly adding too much of lemon juice or vinegar will make the paneer harder & grainier. So begin by adding only a little and add more as needed until it curdles.
- Once the milk curdles completely, turn off the stove and avoid cooking further to prevent the paneer from turning hard.
- It is also good to pour some cold water to stop the paneer from cooking immediately especially if using unprocessed milk.
- Ensure excess whey is drained from the paneer before you keep it for setting. Any excess whey will prevent it from setting well. Or even the paneer cubes may break in the gravy.
Alternative quantities provided in the recipe card are for 1x only, original recipe.
For best results follow my detailed step-by-step photo instructions and tips above the recipe card.
Video
NUTRITION INFO (estimation only)
© Swasthi’s Recipes
How to prevent paneer cubes from breaking in gravy?
I suggest using cornflour only if your homemade paneer cubes ever broke in the gravy. Do not use more than suggested as it may turn the cubes hard after cooking.
Knead the chenna well. There should be no water left it must be only moist. Add 1.5 tsps corn flour, knead it again thoroughly. Make a nice moist rectangle in a plate. If needed can wet your palm to make a moist rectangle. (Not soggy)
Cover the plate with a moist cloth. Refrigerate for 1 hour. Cut to cubes after it is set.


About Swasthi
I’m Swasthi Shreekanth, the recipe developer, food photographer & food writer behind Swasthi’s Recipes. My aim is to help you cook great Indian food with my time-tested recipes. After 2 decades of experience in practical Indian cooking I started this blog to help people cook better & more often at home. Whether you are a novice or an experienced cook I am sure Swasthi’s Recipes will assist you to enhance your cooking skills. More about me
Follow Swasthi’s Recipes
Comments
Do we need to keep the paneer in the fridge while we are pressing it for 4 hours? Is there risk of it spoiling if we do this in room temperature?
Hi Sophia,
If it is too hot where you live, you can put it in the refrigerator. My kitchen is not hot so I leave it outside on the kitchen counter.
Absolutely helpful and easy
Hello! First of all thank you so much for your website… I’ve been making a recipe once a week and we just love our ‘India’ day!
I’ve made the paneer exactly as per the instructions, and I used yogurt – I’m a big yogurt fan – but it didn’t curdle at all. I tried adding a bit more, turning on the heat again… all the tips you gave but nothing, it didn’t even curdle a little bit… So what did I do wrong or is it maybe the kind of yogurt?
I ended up adding vinegar, and then it did curdle very fast and we ate a great Butter Paneer yesterday 🙂
Hello Paul,
So glad to read you enjoy the ‘India’ day. I think it is just the kind of milk. Raw unprocessed milk curdles faster than processed. You may try out with a different brand of milk, preferably non-homogenized. A few readers also had the same experience, so using vinegar could be a better choice. Hope this helps. Thank you for sharing back.
Simple and easy to follow instructions.
Thank you for the recipe! I will try it! What can we do with the whey?
Thanks!
Hi Ada,
You can use it to make dough or add to smoothies. It smells like vinegar so pls note that.
You can also make whey fermented beverages. yum!!
Turned out beautifully, thank you.
I am so excited my first trial to make paneer at home succeeded. Thank you Swasthi. I look forward to make your dhaba paneer curry but should I soak it in hot water first?
You are welcome Samaira. You don’t need to soak homemade paneer. Add it directly as instructed in the recipe
Hi Swasthi
Thank you for this recipe. Is the 1 1/2 tsp cornflour appropriate to 1 1/2 litres milk?
Hi Sharmila,
You don’t need to add corn starch if you follow the recipe correctly.
This is an amazing and easy to use recipe. I’ve had this recipe open for about three weeks on my laptop, dreading to try and fail, I finally attempted for the first time and I’m shocked at how easy this is. Thank you for making this so simple.
I used Nestle full cream milk 1litre (the green and white pack) and 20ml of 5% acidity vinegar (it curdled in less than 30 seconds) and yielded a little over 200 grams. The milk was at a rolling boil (I did scorch it a bit), after curdling I used a stocking as my cloth to collect the Chenna and put it in between two plates after rinsing it and stacked a bunch of canned beans . All in all it turned out great and cost me less than a fourth of the price I’d pay for it frozen (Frozen TTD$85, Fresh TTD$16).
Thanks for trying Selena. Yes I agree it is so easy to make. Glad you got it right.
How many grams paneer it yields with 6cups milk that is mentioned in the receipe?.. I have been following your receipes from last 7 years… right from the time my son was born… I have fed him healthy food following your receipes… Your instructions are crisp and easy to follow…
Hi Joann,
Thank you for being a long-time reader! So glad to know! It depends on the kind of milk. Raw milk can yield up to 250 grams. Processed milk like homogenized yields lesser – around 200 grams. If you feel the yield is lesser than what you expected, try with a different brand of milk.
why are we collecting the whey?
Amy, A lot of people use the whey while making dough, smoothies or add to curries & dal. I discard because it is too sour and alters the taste and flavor profile of the other dishes.
Would this recipe work if l added jerk sauce once cooked then air fried? I bought store paneer in the past and did this and it was delicious. It’s quite expensive to buy in the uk?
This paneer works the same way like store bought paneer. I have a collection of paneer recipes here. You may take a look at it to find how this paneer works in various recipes.
I love getting the spinach paneer dish at the local Indian cuisine. Now I can make some for all occasions. Thank you
Hope you enjoy the palak paneer! Thank you Toba
“Do not use milk that has NOT gone beyond the expiration date.”
This double-negative means we must indeed use expired milk. I didn’t see that stipulation in the ingredients (lol, I’ve never made paneer – don’t laugh!), so wanted to ensure newbies are clear on what to do. Seems like a typo?
Thank you for the easy recipe.
Thanks Ona. It is a typo in the notes section. Edited that!
Thank you so much for this very informative and detailed recipe. I have followed this recipe 4 times now and have had excellent paneer each time. The troubleshooting was especially useful, as sometimes I did have to boil the milk a little bit longer (30 seconds or less) and add a little more vinegar so it would curdle all the way. I have used lemon juice and vinegar and I have also found that with white vinegar I have to use less and there is no taste as long as you rinse it well. Thank you so much! Looking forward to delicious palak paneer tomorrow night!
Hi Swasthi!
Thank you for this fool proof method of making paneer! Success every time.
Just a note: I use curd straight from the fridge as the curdling agent…and the paneer yield almost doubles when the curd is brought to lukewarm-warm temeprature (by adding spoon full of the heating up milk) before adding for curdling. And the curdled mass has bigger chunks too. Thawing the curd to room temperature didnt have this impact. Just sharing, with much thanks…
I made paneer with this recipe and it came out perfectly soft and good. I used white vinegar but would it work with apple cider vinegar? Just wondering if that affects the flavor. I have a large jar of apple vinegar to finish. Would like to use that next time.
Hi Ana Mary,
Thanks for trying. Yes you can use apple cider vinegar. Make sure it has at least 5% acidity and rinse the paneer very well to get rid of the flavor.
Just wondering — is your nutrition info facts estimate for the entire batch? Thanks so much.
Step by step instructions, made it so easy, thanks
Is this recipe easy to double without affecting the texture & integrity of final product?
Yes it works for me. Need to use a wider/large cast iron pan
This was perfect! I used cheesecloth and then, once it was squeezed out well, I removed the cheesecloth and used a tofu press (mine happens to be a TofuXpress) which made it easier to fit it in the fridge while it got pressed. For me, the two tablespoons of white vinegar worked perfectly. Thank you!